The transfer-burn command is a new feature in the CLI, which has been introduced in Haven 4.1 (Hard Fork 24).
This command allows you to burn any available coins in the wallet being used. Coins burnt through this process will automatically update Haven’s circulating supply for the asset being burnt.
NOTE:Please use these commands with care, as you will not be able to retrieve any coins you have burnt.
When you first open the wallet, you must issue the following command in order to enable the burn feature: set enable-burn-experimental 1
This “set” command will not be saved as part of your wallet’s settings. This is done to protect users from accidentally burning coins.
Burn XHV
To burn XHV use: transfer_burn <address> <transfer amount> <burn amount>
<address> is any valid Haven address. <transfer amount> is the amount of XHV you send to the specified address. It can be any amount, but should be small if you only intend to burn coins. <burn amount> is the amount of XHV you intend to burn.
The above example sends 0.1 XHV to the specified address and burns 50 XHV.
Burn xUSD
To burn xUSD use: offshore_transfer_burn <address> <transfer amount> <burn amount>
<address> is any valid Haven address. <transfer amount> is the amount of xUSD you send to the specified address. It can be any amount, but should be small if you only intend to burn coins. <burn amount> is the amount of XHV you intend to burn.
The above example sends 0.1 xUSD to the specified address and burns 100 xUSD.
Burn xAsset
To burn any of the xAssets in your wallet (xBTC, xAU, xAG, etc.) use: xasset_transfer_burn <address> <transfer amount> <burn amount> <xAsset Type>
<address> is any valid Haven address. <transfer amount> is the amount of specified xAsset you send to the given address. It can be any amount, but should be small if you only intend to burn coins. <burn amount> is the amount of the specified xAsset you intend to burn. <xAsset Type> is the xAsset you are intending to burn.
The above example sends 0.0001 xBTC to the specified address and burns 0.01 xBTC.
Multisig
Created On
Updated
byhavenprotocol
The following KB article explains how to create and use a Haven Multisig CLI Wallet. These instructions are based on a 2/3 multisig, meaning that out of a total of three authorized signers, any two are needed to make a transaction valid.
In short, these are the steps needed to create and submit a transaction, provided a multisig wallet has already been created:
Sync wallets A and B.
Export multisig key image from A.
Import multisig key image into B.
Generate TX from B.
Import TX into A, sign it there, then submit it.
Prerequisites
This article assumes that you have used the CLI before. If this is not the case, it’s advised to first familiarise yourself with using the CLI. Please search for “cli” and “local node” in our KB pages to get started.
Run havend and make sure the daemon is fully synced.
Each party (3 in this case) must create a new wallet using haven-wallet-cli (make sure background mining is NOT enabled).
Exit the wallet and backup the seed and make a copy of the wallet files (in case you need to repeat the steps).
Log back into the wallet and run the following commands: set enable-multisig-experimental 1 set auto-refresh 0
Prepare wallets
All parties to type the following command: prepare_multisig .
Send the output to ALL other parties (use a secure platform like Element for sharing). The output should look like this: MultisigxV2R1TYQNzErUgssPfURuXVvEq1M4QfUgpBLrz2HXGKkyaonPCH8Kv6jQLqEGEXUtuJNjELcqLUNHKfEopDqtsyzz4sEbCWhtRanxGm8amKYDHmfFjRCVsR3Xmot8RGLp6WN5KQNLUEpsFNpePMkW8yomYrCFLpCkJ72fkjBUy1qx6TH8L3wQ .
All parties to type the following command: make_multisig 2 <data1> <data2> where <data1> and <data2> correspond to the other parties’ data shared in step 7.
The command should look like this: make_multisig 2 MultisigxV2R1TYQNzErUgssPfURuXVvEq1M4QfUgpBLrz2HXGKkyaonPCH8Kv6jQLqEGEXUtuJNjELcqLUNHKfEopDqtsyzz4sEbCWhtRanxGm8amKYDHmfFjRCVsR3Xmot8RGLp6WN5KQNLUEpsFNpePMkW8yomYrCFLpCkJ72fkjBUy1qx6TH8L3wQ MultisigxV2R1MG7sQpykJTv4RMEuyQV6m1FBX9zVMPXva3dragVUh9F9FjTTmJ4DLvUNP57njearPRbHnFv1NvKMeL1yQTdbcy7nQ1r4rDvJQzHhNvUeCFzAm6TLhwwjAiqfUBtS6ajBFZ8XVsGwLhCc1S3jK7ffsAKaRF9cLyEzJgpaXNShnrsY4hEK .
Send the data generated in Step 8 to ALL other parties. The data should look like this: MultisigxV2Rn1LWRyU32PL2D4MnPtp4w5YFS6KTkanCW18adkxUTdMVJDaqQ9E1gsTRQJTZFADurxZb6w2amhCpHtWHPcykirrk3AE1AS65NxkJG4zRgQJF26m8obGa39AVDYicUsFrL3LRMHF2DUKKckJoYZcRbCUeNP4PBrExea3na2TUm7FEw995ZL5N9n7nVxysH6JdwLfDjXaWDotxZtyPn1ifXvgJHJctsFPP .
All parties to run the following command (1st pass): exchange_multisig_keys <data1> <data2> where <data1> and <data2> corresponds to the other parties data shared in step 9.
The command should look like this: exchange_multisig_keys MultisigxV2Rn1LWRyU32PL2D4MnPtp4w5YFS6KTkanCW18adkxUTdMVJDart7ZPUh6A328nPGtUi3hDQdFr8rNk2aSpMNquYHSbxNhNNpyt2fiGgAxt9woCBXsFtdhKm2dmqqY9qF6ewuBXCDLdJ6rYv1Lm7RyuLN4TQBBccBUesMH6FhGB4FcCncaRh8sEEqcXgR1gbZnEzG6tk81TAthWRqFCZTStSNgD9WJKG7F5 MultisigxV2Rn1LV1jgtbFBZQJTZFADurxZb6w2amhCpHtWHPcykirrk3AE15GGTSNN6328nPGtUi3hDQdFr8rNk2aSpMNquYHSbxNhNZ7Q48j4TRAauoTVenC5ZmsS8EViFdieeHtzgPFwrg9cgAX93F7g4UHyAd82BeTRZb3cxsLGQ3nTZb6ey2HN8dJa6Y8ssCniTd6Kchn4cWhS9Qqz38whxCDNYd7UJCpGCa3k1 .
Send the data generated in Step 10 to ALL other parties. The data should look like this: MultisigxV2Rn1WC6rFTBNJkY4qjHv8UYXGifkHemhyRJmXnNVtQY8dcx4T2fZBnnCy2iMAFVerhacP1UytUMaGyAN5N5XvnXqqY7fyYAaBX639tG4zRgQJF26m8obGa39AVDYicUsFrL3LRMHF3XFVxmv3XjngbXYY47EXY1BgZk6UYxBAN12Ep2ETqR6rpTvUB8QJmQkrdUpiiu146zoiHieUj2He4KwCgkPj9vK7Y .
All parties to run the following command (2nd pass): exchange_multisig_keys <data1> <data2> where <data1> and <data2> corresponds to the other signatories data shared in step 11. This step should generate the multisig wallet and prompt you with the wallet address. .
Compare the wallet address with all parties to ensure that they are the same. If they are not the same, something went wrong and you need to start again using the wallet files backed up in Step 4. .
Type seed and back up the seed string, which looks like this (the multisig seed is different from the usual seed): 020000000300000005cd2e5a01ef0830eb666b838d8402795ae8f24f6e3cf2068ff8e48899aed11f500473d4c3a9b9bb9451f19facfff91def79172ed466b808f9fa2173a25d149e4a1c1161be6c029b2c4d0ca5fc806ddc1d46edc7dc3d0727a68ad2f6d24bf6086d269cfd2255f73375939820a71802e25e12abd220271a16505059cb168ce90367c23b78dda9038037406aafa4e6d8ed363f998209ab2a6432c78e5597411a0fb43da66388574bda7edbe6122ee6e8ce987a5eb553ccf3cac170b8031448aa05436d4f88e749ea315b12c6c3b93e5905d63bd6f29df0ba3f4cc888318a1f49c45813af87c6d890797fd36bb2c61ec3f0cd009ec413d1e10d71b19e4f6b893381d6a58526d2f35a1726e847e4bed22ea71f7deb2dc7aff8c7c12505345af8611a .
Close the wallet and back up the wallet files.
One of the parties needs to send funds to the shared address.
Log back in and sync the wallet to make sure funds have been received and confirmed by all parties.
Preparation for Sending
To prepare for sending, Person 1 types the command: export_multisig_info <filename> <filename> is just a name for the file you want to export, it should be something simple. The file generated is called a Key Image, and is a snapshot of the wallet’s outputs. .
Send the exported file to Person 2. Person 3 can also do this, but not required. .
Person 2 and/or Person 3 downloads the file shared and places it in the same directory as the CLI app. .
Person 2 or Person 3 types the command: import_multisig_info <filename> <filename> is the same file as that created in Step 18 and shared in Step 19. .
Whoever imported the key image in Step 21, is now able to create a Transaction.
Sending
Person 2 or Person 3 creates a transaction in the usual manner by typing: transfer <address> <amount> This will create a file called multisig_haven_tx which is sent back to Person 1. .
Person 1 downloads and places the above file into the same directory as the CLI app and types the command: sign_multisig multisig_haven_tx .
Once successfully signed, Person 1 types the following command to submit the TX: submit_multisig multisig_haven_tx
Notes
If Person 1 and Person 2 conducted one or more TXs and Person 3 wasn’t around, when Person 3 syncs the vault, it will not display the correct amount.
To solve this, Person 3 will have to import the latest Key Image shared in Step 19 from either of the participants using the command in Step 20. Once imported, Person 3 can do a “refresh” and the correct wallet balance will be displayed.
If it takes too long between preparing for sending (sharing key images) and creating the TX, the process may time out and you have to do this stage again.
VBS was first implemented in January 2023 as part of the Haven 3.0 tokenomics update.
As of 29th August 2023, it was updated along with the rebase to Monero v0.18, under Haven 3.2.
VBS stands for Vault Backed Shoring. The phrase implies that you need to back your shoring (offshores & onshores) with funds in your vault. It is a value, a multiplier, which determines the amount of Collateral required in a vault in order to be able to offshore (XHV -> xUSD) or onshore (xUSD -> XHV).
Collateral is referred to as the amount of unlocked XHV in the vault.
What is the purpose of VBS?
In combination with a 14 day lock time of the Collateral and a 24 hour lock time for the Converted Amount, VBS was designed to:
Prevent price manipulation of XHV on exchanges in order to increase XHV inside the vault and to profit from at the expense of XHV holders.
Prevent excessive and rapid inflation of XHV by slowing the shoring process.
Prevent a death spiral.
In the latest release, Haven 3.2, the VBS requirements have been reduced significantly in order to:
speed up conversions and get the protocol working again.
help xUSD regain its peg.
How is VBS calculated?
VBS is a function of the Market Cap Ratio.
Market Cap Ratio
The market cap ratio is a measure of the protocol’s state of health. The formula for calculating the market cap ratio is:
Total Assets Market Cap is the combined value (in Dollars) of all the xAssets (xUSD, xBTC, xAU, etc.). XHV Market Cap is the current circulating supply of XHV multiplied by the current price of XHV.
The ratio between these two market caps determines the state of the protocol. When the market cap of XHV is larger than the Total Assets market cap, the ratio is small, and the protocol is considered to be in healthy state. When the ratio is high, the protocol is considered to be in a bad state.
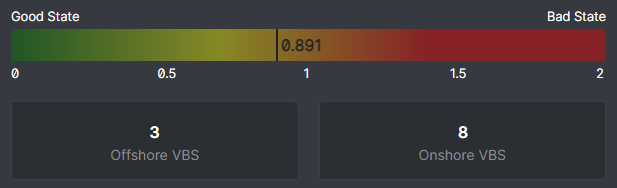
If you log into Haven’s Web or Desktop vault, you will see this ratio displayed on a coloured chart, as shown below.
A healthy state is considered to have a ratio of 0.1 or less, where the XHV market cap is at least 10 times the size of the Total Assets market cap. This affirms that all xAssets are safely backed by the underlying asset of our protocol, XHV.
Market Cap Ratio Calculation
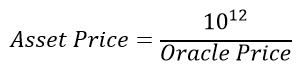
To calculate the market cap ratio for yourself, you need to first calculate the market caps of XHV and the Total xAssets.
The Total Assets market cap is slightly trickier to calculate, unless you are able to automate it. First, you need to get the circulating supply of all assets, apart from XHV: https://explorer.havenprotocol.org/supply
Since Haven’s assets have a large degree of atomic units (12), the oracle price is shown to the power of 12. To calculate the asset price, use the following formula:
Once you worked out the market cap of each asset and added them together, you will arrive at the Total Assets market cap. Now you can calculate the market cap ratio using the formula shown above in the Market Cap Ratio section.
VBS Calculation
The calculation of the VBS has been simplified since the release of Haven 3.2, which can be expressed in a single formula. Offshores and Onshores have a different formula for calculating the VBS in order to make XHV slightly more deflationary compared to xUSD.
Offshore VBS (XHV -> xUSD)
Onshore VBS (xUSD -> XHV)
When you log into Haven’s Web or Desktop vault, the Onshore and Offshore VBS values are displayed just underneath the Market Cap ratio chart:
VBS and the Market Cap Ratio
There are three main factors that can contribute to a rise in VBS:
A decrease in the price of XHV.
Too much offshoring, lowering the market cap of XHV (if price doesn’t rise).
Too much onshoring, which can lead to an increase in the sell pressure of XHV and hence a drop in its price.
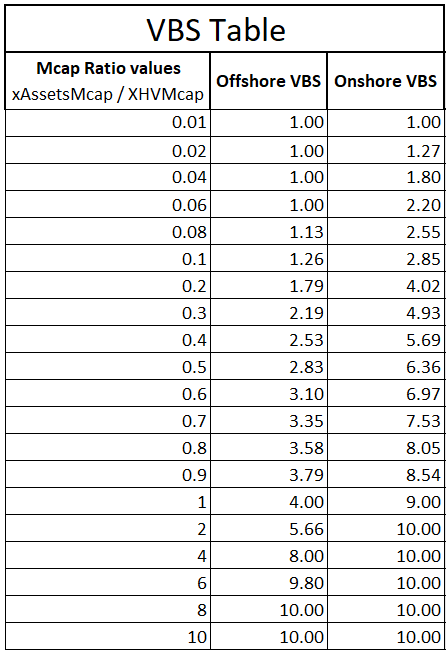
The table below shows the values for the Offshore & Onshore VBS across a range of market cap ratios.
A few points to note about the table:
The minimum VBS is 1.
The maximum VBS is 10.
VBS is more protective towards Onshores in order to prevent inflating XHV too much, too quickly.
How is VBS applied?
VBS is used in conversions between XHV and xUSD (Offshores and Onshores), and its value determines the amount of collateral required for the shoring process.
Offshore example
If you want to offshore 100 XHV and the current VBS has been calculated to be 3, you will require 100 x 3 = 300 XHV as collateral.
After conversion has been confirmed, the 100 XHV that has been converted to xUSD will be unlocked after 24 hours and the collateral (300 XHV) will be unlocked after 14 days.
Onshore example
If you want to onshore 100 xUSD and the current VBS has been calculated to be 10, and the price of XHV is $0.20, you will require (100 / 0.20) x 10 = 5,000 XHV as collateral.
After conversion has been confirmed, both, the converted amount (100 xUSD, or 500 XHV) will be unlocked after 24 hours and the collateral (5,000 XHV) will be unlocked after 14 days.
Will VBS be applied to xAssets?
We are not currently planning to add VBS to xUSD <-> xAssets conversions.
This subject has been discussed extensively in our discord server, so if you would like to voice your opinion on this, please join our server and comment in the “havenomics” channel.
Useful links
Below is a list of some useful links in relation to conversions and VBS.
Haven Chain Analysis This site is currently under construction and when it is ready, it will display charts, market caps, conversion statistics, VBS analysis and more. https://havex.io/haven
To take advantage of the benefits that wrapped tokens bring to crypto without compromising your financial privacy within Haven, there is a simple solution:
Step 1: Create a dedicated Haven Vault account for all wrapped token interactions.
…and that’s it. You can then send your native coins from your main vault to your ‘wrapping vault’ as shown below:
Main Vault >> << Wrapping Vault >> << DeFi ecosystem
All transactions within Haven are private so, by using a dedicated account for all interactions with the wider DeFi ecosystem, you can easily maintain the benefits of full user privacy within Haven, whilst accessing the liquidity and cross-chain utility of DeFi.
Wrapped Token FAQs
Created On
Updated
byhavenprotocol
What is a wrapped token?
A wrapped token is simply a cryptocurrency token that exists on a secondary blockchain This allows the value of a native asset from one blockchain to transfer to another blockchain.
In the case of Haven it is a token that is used on BSC (Binance Smart Chain). It maintains the same value as XHV and is collateralised 1:1 with the native coin at all times.
Why do it on Haven?
The core promise of Haven is to provide a way for anyone to access a stable value cryptocurrency while retaining full user privacy. This vision has been realised with a range of xAssets available on the Haven network, but has however come with a couple of important compromises.
Utilising a wrapped token aims to unlock the potential and reduces the barriers to entry by improving accessibility, liquidity and utility for the network.
Wrapped tokens such as wXHV offer interoperability between blockchains so that people can move assets easily and take advantage of features and applications on other blockchains. Those advantages might be faster transaction times, lower fees, or yield farming opportunities.
How does it work?
Wrapped tokens are created and destroyed by a process called “minting” and “burning.” To mint a wrapped token such as wXHV, the underlying asset, in this case XHV, is sent to a custodian (the multi-sig safe) that stores the XHV in a digital vault. Once the underlying XHV has been locked away, an equivalent amount of wXHV can be minted.
This process can also be understood as “wrapping.” The underlying asset is “wrapped up” in a digital vault using a smart contract, and a newly wrapped asset is minted for use on another blockchain.
To burn wXHV, the same process is followed, but in reverse. The wXHV is removed from circulation, and the equivalent amount of XHV is released from the digital vault and allowed back into Haven.
What happens to my coins when they get wrapped?
Wrapping your coins in it’s simplest form means that you deposit your native coins to a smart contract controlled wallet. The smart contract then checks this deposit and releases the equivalent number of tokens to your receiving address.
The coins you deposited are held in the vault until you decide to ‘unwrap’ the tokens and receive your coins back to your Haven address.
How are they kept safe?
The coins you depositare held in a multi-sig Gnosis Safe. This means that to carry out any transactions it requires a minimum number of people to sign the transaction before any coins or tokens can be moved.
The Gnosis Safe is an open source and formally verified self-custody wallet for use on the Ethereum network and is generally considered to be one of the safest options for mutil-sig storage.
Can I unwrap them whenever I want?
Yes, you can send your tokens back to the wrapping contract address and ‘unwrap’ them back to native coins at any time.
Where can I use my wrapped tokens?
The wrapped tokens will be bridged to BSC (Binance Smart Chain) giving it access to all the DApps and protocols available on that network. An up to date list of those can be viewed here. In future it will be possible to brdige to other EVM chains in order to access their utility and liquidity.
Where can I store my wrapped tokens?
There are many wallets that can be used for storing your tokens while they are not being used. Some of the most popular are listed below:
Do I still have the same privacy when I use the wrapped token?
You do not maintain the same levels of user privacy while using the wrapped tokens as the Ethereum network has greater transparency by default.
However, the core promise of user privacy remains fully intact once you ‘unwrap’ your tokens back to the native coins and transfer them back to your Haven Vault.
It is recommended to always use a dedicated Haven address for all interactions with 3rd party integrations including the wrapped tokens and THORChain.
Running on Flux
Created On
Updated
byhavenprotocol
Introduction
As the project develops and grows it is important to evolve the project infrastructure with it. Being a community led project, it is essential that we decentralize as much of the project as possible and one of the more important parts is the hosting of the infrastructure.
What is Flux?
Flux is a decentralized cloud infrastrucutre service that provides users the ability to host their applications on multiple servers. Running Flux on a blockchain based architecture gives it greater resilience than a central server traditionally used for hosting. You can find out more about Flux here: https://runonflux.io/
Why this matters for Haven
Haven’s infrastructure includes several pieces that are key to users’ ability to seamlessly transact and store their wealth in private. Until recently the web vault, vault nodes, explorer and paper wallet were hosted on Digital Ocean.
Moving the hosting across to Flux will ensure that there is no single point of failure in any of these. Flux currently has over 11k nodes maintaining their network and this will help make Haven more censorship resistant and resilient to attack.
Blockchain Bootstrap
Created On
Updated
byhavenprotocol
When you run your own node there are a couple of options to download the blockchain. You can run your daemon and sync the chain ‘manually’. This can take some time to do, and the chain will take up a lot of storage (~35GB).
It is also possible to speed up this process by downloading the blockchain bootstrap file.
The file can be downloaded from here: No longer available!
To use it you just need to replace your existing mdb file with the downloaded file.
The last update was carried out on 24th August 2024 (~35GB); this will speed up the sync time.
NOTE: Because this is a ‘snapshot’ rather than live import version of the blockchain it is not possible to verify the authenticity of the records. Users download and use it at their own risk.
Assets in Circulation
Created On
Updated
byhavenprotocol
About XHV Supply
All XHV in circulation is from one of two sources.
1. Mining, like any other proof-of-work cryptocurrency.
2. Minting, via the mint and burn mechanism that converts between xUSD and XHV at the current USD value.
Because anyone can mint between assets at any time, the supply of XHV is elastic, fluctuating with each conversion. This, in turn, means that the maximum supply is uncapped. However, it is not infinite, as the quantity mined is restricted by the emissions schedule, and the quantity minted is capped by the availability of tradable assets.
xUSD and xAsset supply
All xAssets in the Haven ecosystem are derived from XHV, using a similar mint and burn mechanism.
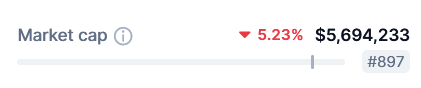
The total of this calculation is visible on the supply page: